

Using OBS Software for Livestream
02/27/2023
Introduction
This guide will help you familizarize yourself with how to use the OBS Studio software to broadcast your livestream event. OBS studio is a free, open source software for video recording and livestreaming.System Requirements
OBS Studio is available on Windows, Mac, and Linux.- Notes
- If you choose to use OBS Studio on Mac, you will need to download a virtual sound card software to capture audio from other applications on your computer.
- Make sure that each software that you use is updated to the latest version.
- Do not turn of your computer or allow it to fall asleep during the livestream at any time.
- Turn off system notifications.
Network Requirements
- Connect your computer to a wired, ethernet connection. A wireless connection should only be used as a backup. It is recommended that your connection has a bandwidth of at least 20Mbps.
- You may check your network speed at https://www.speedtest.net
Download and Installation
You may download OBS here: OBS DownloadOnce OBS is installed, you should see a dashboard like this.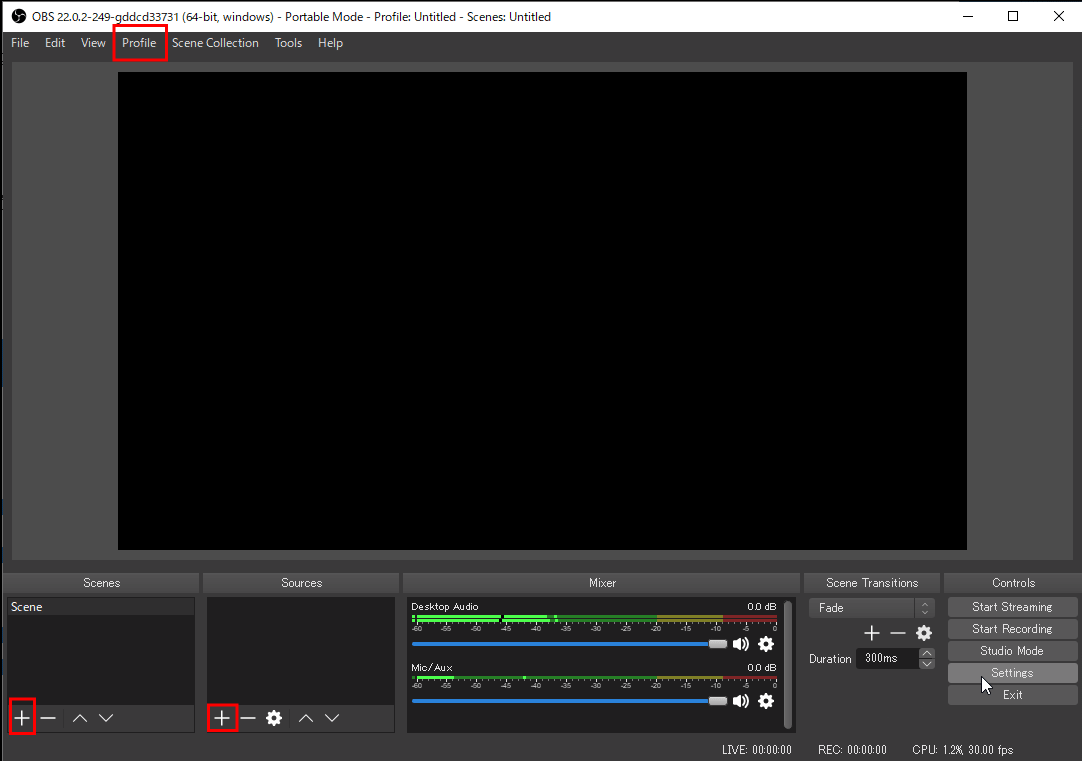
Creating a Scene and Selecting Your Inputs
Follow these steps to start your stream: 1) Create a profile: select the "profile" tab on the top, and give your new profile a name.2) Set up a scene: press the "+" button in the scene selection section on the bottom left. 3) Add your audio and video sources: press the "+" button below source. Select your camera and mic.Setting your OBS Settings for TikTok
Resolution & Aspect RatioBase (Canvas)
- This is the amount of space that you allocate to placing your sources. To maximize space, you should enter your resolution of the display you plan to use.
- Adjusting the base resolution will allow you to set the resolution and aspect ratio of your proadcase. For example, setting it to 1080x1920 will give you a 9:16 aspect ratio.
Output
- Output, or Scaled, Resolution should match your Stream Output Resolution (720p, 480p, etc.)
- This will be the output resolution of your stream. Here, you can limit the output resolution if you wish. For example, you can limit a 1080p source video to a 720p source video.
- Your Output Resolution will automatically adjust after you set your base resolution, but it's a good idea to check this to make sure it's what you want.
Common FPS
- You should set this to your desired FPS. 25PAL is recommended.
Size Adjustment & Rotating Your Output
- You may change the size of your output or rotate it by changing your Base resolution and then rotating your source.
- Tip: When adding a local source, select "Use hardware decoding when available".
Bitrate for Streaming
- Set your Video Bitrate. It should be around 2500Kbps.
- Encoder: x264 software encoder is compatible with all computers. If your computer has a hardware encoder, you may choose the option best for you.
- Set your Audio Bitrate: 160kbps is the default bitrate for OBS. You may keep it or choose another bitrate. 256kbps is also common.
Using the OBS Audio Mixer
- Functions
- Mute/Unmute
- Volume Adjustment
- Advance Settings
- Tips:
- When using multiple audio sources, assign unique names to each one.
- The suggested formats are [source type], [file name], [file purpose (intro, bgm, etc.)], or a combination of these.
- When capturing video from your desktop, turn off notifications.
- When using multiple audio sources, assign unique names to each one.
Streaming to Your TikTok Account
1) Open TikTok2) Go to the navigation bar at the bottom and tap the plus "+" buttom. 3) Select the "Transfer to PC/Mac" option. After clicking on "Go LIVE", you will see the RTMP server and stream key. 4) Open Settings in OBS5) In the "Stream" tab, fill in the RTMP Server and Stream Key information you just obtained. Click "OK" when done to apply settings.5) When you're ready, click "Start Streaming" to start your broadcast.Recording Your Stream
Automatic Recording
- In the "General" tab of Settings, check "Automatically record when streaming" under the "Output" section. Click "OK" when done to apply settings.
Manual Recording
- Manually start your recording by pressing the "Start Recording" button, located below the "Start Streaming" button on the bottom right hand corner of your OBS interface.
Selecting a File Destination
Go to the "Output" tab of your Settings. Under the "Recording" section, click Browse and choose a file location. Click "OK" when done to apply settings.Troubleshooting
Livestream Has No Sound
- Identify the audio inputs you wish to add to your stream.
- Microphone
- Make sure that your microphone has been added as an input.
- Make sure the scene you've selected is using your microphone as an input.
- Check that the microphone is on and not muted, and that the gain is turned up.
- Media Sources
- Make sure your media sources's audio track is selected.
- Make sure the scene you're in is using your media source.
- Make sure that you're not muted in the Audio Mixer. The audio meter should move when you play your media source.
- Microphone
Livestream Has No Sound from Other Applications
- Make sure the application is not muted in the "Audio Mixer"
- Make sure that the scene you're in includes the other applications.